How to create a custom instrument on top of Timelane!
You can easily log data in Instruments by using the functions in Apple’s os framework. All you need is to use
os_log(…) and that will log data in Instruments. If you’d like to read more about this check out Recording Performance Data Apple article.
Creating a real custom instrument, however, is a little more complicated as you can learn in Creating Custom Instruments WWDC2018 video and it involves XML, CLIPS, and more complex stuff.
Timelane custom instrument
In this post I’ll show you how to get best of both worlds - create your own custom instrument in Swift based on Timelane.
What? … Yes, you heard right. Let’s get started!
Note: Before using the approach described below you need to install Timelane first from http://timelane.tools for free.
Timelane has a modular structure allowing for different “client” packages to use the same underlaying structure - this allows the Combine specific Timelane package, the RxSwift Timelane package, the Operation package, and any other potential client libraries to use the same protocol and infrastructure:
So as long as you use the TimelaneCore APIs you can easily create your own custom instrument that plugs right into the already established infra:
Let’s create a custom instrument that visualizes when a task queue gets too busy. The instrument will log the state of a custom task queue and more specifically will log when there are more active tasks than a given threshold:
To simplify the custom instrument we’re gonna create its API as an easy-to-use property wrapper, boom!
Starter App
I have an app using a custom task queue; in my case the queue is just an array of type [Task].
For my app I’ve decided that 18 active tasks are about as much as it’s reasonable to run at a time (an arbitrary number based on manual testing). To track if my task queue is getting more than 18 at a time I display the amount on screen via a label that turns red when the queue goes over the threshold:
|
|
This tracks the task count on screen like so:
If you watch the video end-to-end you’ll see that there are two time intervals when the counter goes over 18 for a while and turns red.
To get a better and more detailed picture of where those bottlenecks in the performance of my app are I’ll create a custom instrument.
Getting Started with a Property Wrapper
First of all I’ll import TimelaneCore in my Xcode project. You can do that via CocoaPods or Carthage, but I’ll just use Xcode. Click on File/Swift Packages/Add Package Dependency… and add https://github.com/icanzilb/TimelaneCore.
I’ll start with a file called BusyQueue.swift and a bare bones property wrapper:
|
|
This code creates a new property wrapper that can be used on [Task] properties and sets the logging threshold.
Next, let’s add one more parameter called name to the wrapper to be able to create a named subscription in TimelaneCore:
|
|
subscription is an instance of Timelane.Subscription which is a handle you can use repeatedly to log on to the same lane in Timelane. (E.g. if you’ve used TimelaneCombine - this is the unique name for each logged subscription)
I can now use the new property wrapper to wrap my original task queue like so:
|
|
The only remaining step is to use the Timelane.Subscription to log to Timelane.
Creating Ranges
Switchinng back to BusyQueue.swift I’ll add some code to the wrapperValue setter like so:
|
|
The added code tracks whether the number of active tasks is going over or under the threshold - when it goes over we call subscription.begin() and that will create a range in the Subscriptions instrument in Timelane. When the number of tasks goes under the threshold we call subscription.end(state:) to close the open range.
With all the moving pieces in place I can profile my app in Timelane (Cmd + I) and see the results:
The first thing that my new custom instrument is telling me is that there aren’t only two intervals as I thought when the task count goes over my threshold. This, in fact, happens multiple times but most times for such a short period of time that I haven’t noticed it. Sometimes the number of scheduled tasks goes above 18 for just 250μs - that’s much too short for me to notice by looking at the UI.
Note: If you’re not familiar with the Timelane UI you can watch through some of the videos available at http://timelane.tools/#videos.
Now you can comfortably see when the queue is in busy state plotted on the timeline.
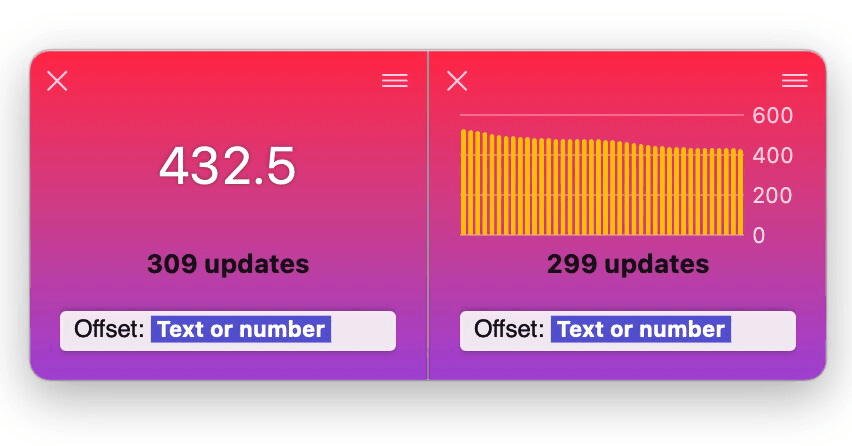
Now I’m also curious to see the actual values - exactly how much over 18 we’re going while the queue is in a busy state?
Logging Values
To do this we’re gonna use the Events over Time instrument in Timelane. Inside the wrappedValue setter I’ll add one more condition:
|
|
This will, for all values over the threshold, log the amount of tasks in the queue in Timelane when a task is added or removed.
When I profile one more time I see the amounts logged as so:
You can use your custom instrument like any other instrument - you can scrub through the timeline to replay the events back and forth, you can click on the events to jump the right moment on the timeline, you can view all aggregations, filter the logged data, select regions to inspect, save recorded sessions, etc. etc.
So if you’re already getting ideas for implementing your own custom instruments head to the TimelaneCore repo and check out the README: https://github.com/icanzilb/TimelaneCore.
The completed code of BusyQueue is as follows:
|
|
You can download the complete Xcode project at: https://github.com/icanzilb/CustomInstrument
Where to go from here?
If you want to learn more about Timelane, to download it for free, or watch some example videos head to: http://timelane.tools.
Thank you and if you have any questions, feedback, or press inquiries do get in contact at https://twitter.com/icanzilb.
To learn about all Combine check Combine: Asynchronous programming with Swift - this is where you can see all updates, discuss in the website forums, and more.